Tuesday, January 15, 2013

How to force browsers to use IPv6 Instead of IPv4

I am using freenet6/gogo6 IPv6 tunnel broker service for IPv6 connectivity. First you need to set up IPv6 tunnel. But many times when I visit IPv6 enabled web-sites then browser connect to IPv6 enabled using using IPv4 like gmail.com.

So the trick to force browser to use IPv6 is to disable IPv4 DNS server or completely disable IPv4 address scheme from network configuration and replace the IPv6 tunnel address with the naked IPv4 address in tunnel configuration file so the computer is able to connect to IPv6 tunnel without IPv4 DNS.

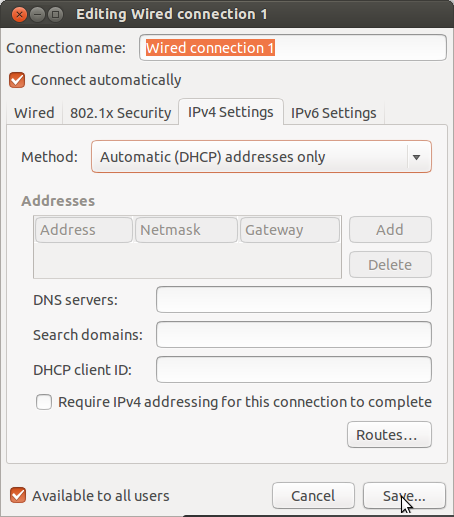
Here is how to do it on Ubuntu 12.10, Simply go to Network Connection and edit your internet connection. 


-->


Check IPv6 DNS servers are properly set up.
Choose "IPv4 Settings" and change Method to "Atomatic (DHCP) address only" and then do not provide ant IPv4 DNS server . Save and reconnect to network.
IPv4 sites still work but those web sites which are IPv6 enabled are accessed through only IPv6. Some application may crash (like network tools) or may not work at all because there is no IPv4 DNS address. IPv4 can be disabled completely if not required. After completely disabling IPv4, only IPv6 enabled web sites will open.

For gogo6 / freenet / gogoc users: 

Use the IPv4 address instead of any domain name in gogoc configuration file.
sudo nano /etc/gogoc/gogoc.conf
For server=montreal.freenet6.net IPv4 address value is 64.86.88.116. It should look like this:
server=64.86.88.116
Save and close file. This command will be helpful if you face any key related problem in gogoc :

sudo /usr/sbin/gogoc -n
Press ctrl+c to end the above command if it do not end itself.


Now restart gogoc service with the following commands using appropriate command:
to start:      sudo service gogoc start
to stop :      sudo service gogoc start
to restart:    sudo service gogoc restart


You may observe some frequent disconnect of network connection or no internet connectivity on PC start-up or when network reconnect occurs. This is because IPv6 tunnel takes some time to connect.

Sunday, January 13, 2013

Configure IPv6 tunnel on Ubuntu

Having trouble configuring IPv6 tunnel on Ubuntu. Follow these 10 simple steps below to configure IPv6 tunnel on Ubuntu easily.

Step 1: First signup with a free account on gogo6.


Step 2: Get free freenet6 tunnel from here (gogo6 account required from step 1). You will receive a username and password in your email box from this step. These will be your tunnel username and password. These will be used in step 4.


Step 3: Install gogoc and Router Advertisement Daemon from Ubuntu Software Center.


Step 4: Now edit /etc/gogoc/gogoc.conf in your favorite text editor. Super User or root privileges are required.
  • Open terminal: ctrl+alt+t .
  • Run this command:  sudo gedit /etc/gogoc/gogoc.conf
  • Run ifconfig command in new terminal window [ctrl+alt+t] and get interface name. Usually it is eth0 for wired and wlan0 for wireless connection.
  • Edit the following fields:
userid= #tunnel user id from step 2
passwd= #tunnel password from step 2
server=montreal.freenet6.net or amsterdam.freenet6.net
auth_method=any
host_type=router
if_prefix=eth0   
#run command "ifconfig" to check its correct value, usually its eth0 or eth1 for ethernet and wlan0 or wlan1 for wireless lan.
dns_server=2001:4860:4860::8888
tunnel_mode=v6anyv4
log_console=0
log_stderr=1
log_file=1
log_syslog=0
log_filename=/var/log/gogoc/gogoc.log
Leave the rest fields to their default. Save the file [ctrl+s] and close.
    For Sever use montreal if tunnel endpoint you choose in step 2 is montreal then it becomes montreal.freenet6.net or use the naked IPv4 address (64.86.88.116) of montreal server.

Step 5: Open terminal and check that gogo6 service is running or not.
  • To start gogo6: sudo service gogoc start 
  • To restart: sudo service gogoc restart 
  • To Stop: sudo service gogoc stop
  • After a proper start or restart you will see [OK] in terminal.
-->

This command will be helpful if you face any key related problem in gogoc :
sudo /usr/sbin/gogoc -n
Input Yes when it asks and press ctrl+c to end after a minute.


Step 6: Now open the gogo6 log file /var/log/gogoc/gogoc.log . If you are successfully connected then you will see:
Your IPv6 address is 2gge:0ty0:1000:000b:0000:0000:0000:gfgf
Your IPv6 prefix is 2gge:0ty0:1rr6:ty00:0000:0000:0000:0000/56
Your IPv6 DNS address is 2001:4860:4860:0000:0000:0000:0000:8888

These address will be different in your gogoc log file. Computer now have its own global IPv6 address.

If you see finished at the end of gogo6 log file then it means gogo6 tunnel is disconnected and repeat step 5. If problem persist then check userid and password are correct and are from step 2.


Step 7: Create if does not exist and edit /etc/radvd.conf , Similar to step 4. Replace its contents with
interface eth0
{
   AdvSendAdvert on;
   prefix 2gge:0ty0:1rr6:ty00:0000:0000:0000:0000/56
   {
        AdvOnLink on;
        AdvAutonomous on;
   };
};
Replace the prefix value in above lines with the prefix value that your computer get from gogo6. Its in log file at /var/log/gogoc/gogoc.log. 

Restart Radvd Service: sudo service radvd restart.


Enable IPv6 routing: Edit the sysctl.conf to enable IPv6 routing with the following command.
sudo gedit /etc/sysctl.conf
Un-comment the following line / Remove hash from the start of the following line:
net.ipv6.conf.default.forwarding=1

Step  8:
Reset network connection (disconnect and connect) or restart computer. Wait few seconds and IPv6 tunnel will connect itself. View Connection Information to check IPv6 address.


Step 9 (optional): Sometimes tunnel will take too much time to reconnect. To avoid this you can change the following fields in gogoc configration file at /etc/gogoc/gogoc.conf
auto_retry_connect=yes
retry_delay=5
retry_delay_max=30
You can repeat step 5 to check gogoc is running or not.


Step 10: You are required to add IPv6 DNS server address manually. To add IPv6 DNS server:


Edit Network Connections

Change method to "Automatic, address only" and add the Google IPv6 DNS server address.
After saving settings and resetting network, Connection Information will show this.

+ Point: With this setup you can make free calls to USA and Canada. Check out Google Voice in your Gmail.


Now Google my ip to get to now your IPv6 or Test IPv6. The tunnel will break if the network connection is reset. Gogoc tunnel will reconnect if not then restart it manually. If you want to force IPv6 over IPv4 than visit this blog article.


Make free calls to USA/Canada


Want to make free calls to USA and Canada with free IPv6 tunnel having endpoint in USA or Canada. 

All you need is a good internet connection and computer with mic and audio output. 

-->