Wednesday, November 27, 2013

How to Fix or Upgrade or Update or Recover Android Infinity Boot Loop Without Wiping User Data

Update: Jump to step 3 if you just looking your nexus to update to a new android version without wiping user data using Google Nexus Factory Images.

Warning: Backup your data always. Its risky. Things go wrong anytime.

My Nexus 4 stuck into infinite boot loop and this is how I saved my data. If you are facing problem similar to me than it may help you.

I have tested the following steps on Nexus 4 running KitKat Andriod 4.4 . I am not sure its going to work for your device or not but its better to try once than to wipe out data on phone. My phone was already rooted when it stuck in BootLoop. I am not sure what is the cause but looks like the BootLoop is caused by old version of Xposed Installer, its better to update.

You may also try to updating Android to newer version before receiving OTA update (Go to step 3). Don't forget to backup your data in case.

Try at your own risk. It may lead to anything. You should know what are you doing.

Step 1: Desktop Setup [Optional: only if you are using Ubuntu]:
The following steps are required on your desktop system that you'll need in order to flash and communicate with the device.

The PPA has the tools and dependencies to support Precise, Quantal, Raring and Saucy. Add the Ubuntu Touch PPA by adding the following custom source list entry to your /etc/apt/sources.list file.

On your computer, press Ctrl+Alt+T to start a terminal.

sudo add-apt-repository ppa:phablet-team/tools

or if add-apt-repository is not available, append the following to your sources.list:

deb http://ppa.launchpad.net/phablet-team/tools/ubuntu [dist-codename] main
deb-src http://ppa.launchpad.net/phablet-team/tools/ubuntu [dist-codename] main


*Note: replace [dist-codename] with precise, quantal, raring or saucy.
Then do the following:

sudo apt-get update
sudo apt-get install phablet-tools android-tools-adb android-tools-fastboot

If you are not using Ubuntu or Debain than you should get "fastboot" utility for your OS.

Step 2: Download factory Image for Nexus Android Device from here and extract.

Step 3: Open all script files (i.e. open '.sh' & '.bat' files with editor) and edit the following line. For example:
fastboot -w update image-occam-krt16s.zip
to
fastboot update image-occam-krt16s.zip
Just remove the "-w" option from all script files and save. '-w' option for fastboot command formats all the partitions.


Step 4: Bootloader should be unlocked already. Unlocking bootloader will wipe or format you phone. So if your device it not unlocked already then this trick may not help you.

To Unlock BootLoader:
Now, with the device powered off, power on the device by holding the Power button + volume up + volume down. The device will boot into the bootloader or fastboot mode. Plug the device into the computer via the USB cable.

On your computer, press Ctrl+Alt+T to start a terminal. Run the following command.

sudo fastboot oem unlock

On the device screen, accept the terms of unlocking. Last command might work without 'sudo'.

Step 5: Now navigate to folder using 'cd' command to the folder/directory where you have extracted the downloaded image file and have edited all script files. Now open terminal to run "flash-all.sh" script or find instructions here.

sh flash-all.sh

Don't remove the USB cable while this process continue.

Step 6: With in few seconds your phone will reboot by itself and your data including all apps will be there if you are lucky.

You can also use the following steps to Update Android to next version manually, alternative to OTA update, without having to format data. It did not work for me last time. But it worked this time. Always backup your data.

Update: One can also re-flash the same image as in phone currently again and than install updates via  OTA. Than re-root again.

Tuesday, March 12, 2013

Google Play recommends to switch to the new Developer Console!

Google Play developer console has now finally recommends to switch to new Developer console with version 2. Below is the message alert displaying in Google Play Developer Console.


Now is the time to make the switch to the new Developer Console! The new version features a streamlined publishing flow, store listings in more languages with language-specific graphics, and new user ratings statistics in addition to all of the functionality of the old version. We'll be retiring the former version on April 15 to focus our efforts on this new experience so that you’ll have better tools for delivering great Android apps that delight your users.


New Developer Console is far better than the old and a good layout and interface.

New Google Play Developer Console Version 2

Sunday, March 10, 2013

Getting Started with Ubuntu

New to Ubuntu and have installed a fresh Ubuntu version. Facing problem in finding and installing software. Here is small and simple steps to solve this issue.

1. Get Ubuntu One account: 

Ubuntu One is a cloud which helps store, sync and share information in a Canonical cloud and it comes with 5 GB storage. Sign up for Ubuntu One account and log-in with the Ubuntu One app provided by Ubuntu and select folders to sync. The same log-in will be used in Ubuntu Software Center.

2. Learn to Use Terminal:

Terminal is very important software in Ubuntu or Linux. It can be opened vary easily with the keyboard key combination:  ctrl+alt+t or find "terminal" in dashboard search. Terminal is used to run commands. Try your first command in terminal. Write the following text line in terminal.
sudo apt-get update


It is recommended to run above command if you did offline installation. The above command will ask for administrator password and then will check for updates. Usually it is log-in password. It will also update the software catalog. So there will not be any problem while installing software packages later. It will take few minutes to complete.


2. Install Software Packages in Ubuntu:

Ubuntu comes with lot of useful software packages pre-installed like browser, office suite, document viewer, transmission etc. But a lot of packages has to be installed to fulfill different requirements.

So Ubuntu comes with a Software Center and have a great catalog of Software Packages and is properly categorized. Here is a list of few important software packages. Open the Software Updater app from dashboard and install the following software packages along with their add-ons listed in Ubuntu Software Center:
  1. VLC - Read, capture, broadcast your multimedia streams
  2. Ubuntu Restricted Extras - Commonly used applications with restricted copyright (mp3, avi, mpeg, TrueType, Java, Flash, Codecs)
  3. 7zip - 7zip compression/un-compression tool includes rar support
  4. Chromium Web Browser - Browser to Access the Internet
  5. ia32-libs       - Required to run 32 bit software on 64 bit platform.
  6. OpenJDK Java 7 Runtime - OpenJDK Java runtime, using Hotspot JIT
  7. Klavaro - Yet another touch typing tutor
  8. Arista Transcoder - Convert multimedia for all your devices
  9. GParted Partition Editor - Create, reorganize, and delete partitions
  10. Multiget - Download Manager
  11. Stellarium - Planetarium
  12. GIMP Image Editor - Create images and edit photographs
  13. Blender - 3D modeling, animation, rendering and post-production
Install all of above packages with all in one command from terminal:

sudo apt-get install vlc vlc-plugin-notify vlc-plugin-pulse ubuntu-restricted-extras ubuntu-restricted-addons flashplugin-installer flashplugin-nonfree-extrasound  ttf-mscorefonts-installer p7zip-full p7zip-rar chromium-browser djview-plugin ia32-libs openjdk-7-jre icedtea-7-plugin klavaro arista gnome-codec-install python-webkit multiget stellarium gimp gimp-data-extras gimp-flegita gimp-gmic gimp-gutenprint gimp-plugin-registry gvfs-backends xcftools blender yafaray gparted  

-->
All these software packages are available from Ubuntu Software Center, But there will be lot more software packages which are needed to be download from the internet in the form of .deb packages.
If you intend to develop then you have to install many development related packages according to your needs. There are lot of them available in Ubuntu Software Center. For java, c, c++ you may need following.
  • Oracle JDK 7
  • build-essentials (Available from Ubuntu Software Center)
  • Eclipse - Eclipse Integrated Development Environment (Available from Ubuntu Software Center)

Saturday, March 2, 2013

Raspberry PI as IPv6 router in Home Network

Its been many years IPv6 is introduced but still most ISP are using IPv4. Here I am sharing, how to use the Raspberry Pie as IPv6 router in tunneled mode. No need of IPv6 capable router. IPv6 will also work over Wi-Fi of old IPv4 router. I am using the IPv6 tunnel broker gogo6/Freenet for IPv6 connectivity.

Requirements:
  1. Raspberry Pi with Raspbian Wheezy
  2. Connect Raspberry Pi to router with Ethernet cable
  3. Optionally connect to raspberry pi using shh with this command from the terminal:
  4. ssh pi@ip_address

Step 1: Login in your Raspberry pi via ssh and install gogoc client and radvd with the following command.
sudo apt-get update 
sudo apt-get install gogoc radvd
gogoc is client for IPv6 tunnel broker freenet and radvd is used to provide router functionality.

Step 2: Now sign up for gogoNET account and login.

Step 3: After login, get your freenet6 tunnel username and password from here. Freenet6 tunnel username and password is different from login. Choose any one of the tunnel end point server and make new username and password for the freenet6 IPv6 tunnel.

Step 4: Now edit the gogo6 configuration file with the following file.
sudo nano /etc/gogoc/gogoc.conf
Edit the following fields:
userid= #tunnel user id from step 3
passwd= #tunnel password from step 3
server=montreal.freenet6.net or amsterdam.freenet6.net
auth_method=any
host_type=router
if_prefix=eth0   
#run command "ifconfig" to check its correct value, usually its eth0 or eth1 for ethernet and wlan0 or wlan1 for wireless lan.
dns_server=2001:4860:4860::8888
tunnel_mode=v6anyv4
log_console=0
log_stderr=1
log_file=1
log_syslog=0
log_filename=/var/log/gogoc/gogoc.log
Leave the rest fields to their default.

Step 5: Now restart gogoc service with the following commands using appropriate command:
to start:      sudo service gogoc start
to stop :      sudo service gogoc start
to restart:    sudo service gogoc restart


This command will be helpful if you face any key related problem in gogoc :
sudo /usr/sbin/gogoc -n

Step 6: Run the following command.
ifconfig
You should see "tun" interfaces and IPv6 address allocated to your PI if you properly configured the gogoc configuration file in step 4.

Step 7: Now open the log file of gogoc to see prefix allocated to you with the following command:
cat /var/log/gogoc/gogoc.log
You should see a line:
gogoc: Your IPv6 prefix is 2221:0222:1996:0000:0000:0000:0000:0000/56 
if you are successfully connected. Copy it. If there is no IPv6 address than it will show some error messages and will retry after some time.

Step 8: Enable IPv6 routing. Edit the sysctl.conf to enable IPv6 routing with the following command.
sudo nano /etc/sysctl.conf
Uncomment the following line / Remove hash from the start of the following line:
net.ipv6.conf.default.forwarding=1

Step 9: Now we will configure radvd. Run the following command
sudo nano /etc/radvd.conf
Paste the following lines in this file:

interface eth0
{
   AdvSendAdvert on;
   prefix 2001:xxxx:xxxx::/64
   {
        AdvOnLink on;
        AdvAutonomous on;
   };
};


Replace the eth0 with network interface prefix you want to configure. It has same value of if_prefix in step 4 or check it with "ifconfig" command. Usually it is eth0 or wlan0.


Replace the prefix in the above line with the prefix allocated to you from step 7 like this:
prefix 2221:0222:1996:0000:0000:0000:0000:0000/56

-->

Step 10: Now restart radvd with the following command.
sudo service radvd restart
Step 11: Explicitly provide IPv6 DNS in PC network configuration. Prefer Google IPv6 DNS servers.


To force IPv6, do not provide IPv4 DNS:
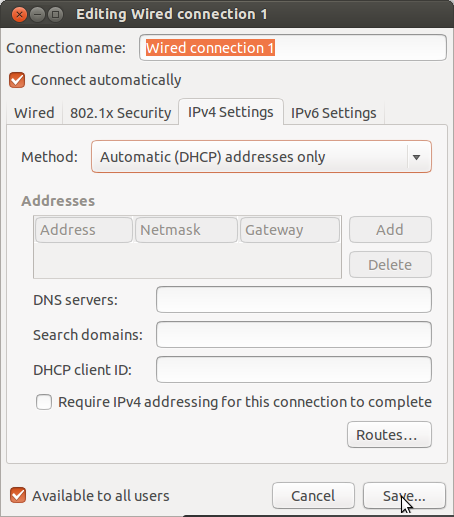
In IPv4 Settings select Automatic(DHCP) Address only and do not provide DNS server. IPv4 only websites will resolve   fine as IPv6 DNS is already provided in IPv6 Settings.

Now Raspberry PI will work as a IPv6 router in tunneled mode and it will work on Wi-Fi of your home router also. Android device may not work in only IPv6 only network. Check out your IPv6 Connectivity from here or Google for many other test sites. Now all devices will automatically get IPv6 addresses. One of the best thing with IPv6 is that no port forwarding is needed. Check that PC is getting IPv6 address automatically. Many web site will prefer IPv6 automatically like Google and Yahoo.

Tuesday, February 19, 2013

HP Pavilion g6-2313AX Ubuntu Linux Driver Problem Solution / Review

Updated for Ubuntu 13.04.
I recently purchased HP Pavilion G6-2313AX Laptop. Its ships with free DOS. Here I am sharing my experience with Ubuntu on it which is not that good. For Windows 8 drivers visit here. Its hardware specification are:

Product Nameg6-2313ax
Product NumberD5F90PA
Microprocessor2.3 GHz AMD Quad-Core A10-4600M
Microprocessor Cache4 MB L2 cache
Memory6 GB 1600 MHz DDR3
Video GraphicsAMD Radeon HD 7660G/7670M Dual GPU (2 GB DDR3 dedicated)
Display15.6" diagonal HD BrightView LED-backlit (1366 x 768)
Hard Drive1 TB 5400 rpm SATA
Multimedia DriveSuperMulti DVD burner
Network CardIntegrated 10/100 BASE-T Ethernet LAN (RJ-45 connector)
Wireless ConnectivityBluetooth
802.11b/g/n
Sound2 x Altec Lansing Internal speakers; Dolby Advanced Audio v2 Audio playback; Dual speakers
KeyboardFull-size island-style keyboard
Pointing DeviceTouchPad supporting multi-touch gestures and on/off button
PC Card SlotsMulti-format digital media card reader for secure digital cards & multimedia cards
External Ports
    2 SuperSpeed USB 3.0
    1 HDMI
    1 VGA
    1 RJ-45
    1 Headphone-out (Stereo)
    1 Microphone-in
Dimensions37.6 x 24.4 x 3.63 cm
WeightStarting at 2.48 kg
Power90W AC Power Adapter
6-cell Li-Ion
What's In The BoxHP TrueVision HD Webcam with integrated digital microphone (High Definition low-light)
Source

As a Ubuntu user I installed Ubuntu on it. Installation of Ubuntu is very simple and Ubuntu installed successfully and supports UEFI boot. The problem starts after the installation complete. Drivers for many devices are not available with default Ubuntu installation. Some of the problems I faced are:

  • No graphic driver by default.
  • Without graphic driver brightness up/down key does not work.
  • Processor runs at full load without graphic driver and fan make too much noise
  • No driver support for Bluetooth in Ubuntu 13.04
  • Wifi on/off key on keyboard indicator does not work
  • Poor battery life without graphic driver
  • AMD proprietary graphic driver (fglrx) from Ubuntu Software center fails to load.
  • Touch-pad on/off button do not work with Ubuntu 13.04
I searched the internet for the solution of these problem and found solution to most of the problems. Here I am sharing all those solution at one place.

Update Ubuntu First:
Connect to internet using LAN/Ethernet or by some other means as WiFi does not work with default installation. Just after installation first thing to do is to update the Ubuntu . This can be done easily using Software Updater available from Ubuntu dashboard. Install all new updates and restart PC when it ask to do so. This will require fast internet connection.

Do not update if you are installing Ubuntu 13.04 otherwise new Linux Kernel will create problem for WiFi drivers. Check the Linux Kernel version support the WiFi drivers which is available in Ubuntu updates. See the Installing WiFi driver below in this article.

Installation of Graphic Driver for AMD Radeon HD 7660G/7670M Dual GPU:
Visit the AMD web site and download latest beta graphic driver from AMD siteThis link has the newest stable and beta version of AMD Catalyst proprietary Linux display driver. The stable version now works good with with this laptop's hardware so no need to try beta version and the stable version works great.

Open the terminal and run the following command:
sudo apt-get install build-essential cdbs fakeroot dh-make debhelper debconf libstdc++6 dkms libqtgui4 wget execstack libelfg0 dh-modaliases linux-headers-generic ia32-libs
Usually the downloaded file goes into Downloads directory. Now extract the downloaded AMD driver file and there will be a .run file after unzip. Change the directory to Downloads in the terminal using command.
cd Downloads
Run these commands in terminal and check the file name of the downloaded file:
sudo sh ./amd-catalyst-13.4-linux-x86.x86_64.run
This command will ask you enter root password, provide and further graphical installation will start. But no text will be displayed on the buttons so continue blindly clicking right most button with default installation.

-->


On the next screen there will be a window showing progress two bars. At the end it will ask to restart. After restart check the brightness up/down keys if they are working or not. They should be working fine now.

From Ubuntu dashboard open AMD Catalyst Control Center to view and change the settings.

Graphics Information.
To get more battery backup choose Power-saving GPU.

After installing the AMD Radeon HD 7660G/7670M Dual GPU processor will run smoothly and the processor fan will make less noise.

There will be a watermark  displaying "AMD Test Use Only" at the lower right corner of the display. To remove it visit this link.

One important thing that I observe is that whenever I install updates the graphic driver breaks and I have to uninstall graphic driver from terminal and then reinstall them.

Installing WiFi Driver:
This laptop has the following WiFi and blutooth components.
Network controller          Ralink corp. Device 3290
Bluetooth          Ralink corp. Device 3298

WiFi works with default drivers provided but there are frequent disconnects even if laptop is just few feet away from router.So poor WiFi drivers support, so I would recommend to use external WiFi dongle.


Bluetooth never worked and I did not wasted time on it as I do not need it.

Benchmarks for HP Pavilion g6-2313AX:

Package used : HardInfo 0.5.1

CPU Blowfish:
HP Pavilion g6-2313AX   1999 MHz3.979
Intel(R) Celeron(R) M processor 1.50GHz(null)26.1876862
PowerPC 740/750 (280.00MHz)(null)172.816713

CPU CryptoHash:
HP Pavilion g6-2313AX                               1999 MHz305.384

CPU Fibonacci
HP Pavilion g6-2313AX   1999 MHz2.187
Intel(R) Celeron(R) M processor 1.50GHz(null)8.1375674
PowerPC 740/750 (280.00MHz)(null)58.07682

CPU N-Queens
HP Pavilion g6-2313AX                              1999 MHz6.346

FPU FFT
HP Pavilion g6-2313AX                             1999 MHz1.237

FPU Raytracing
HP Pavilion g6-2313AX1999 MHz3.772
Intel(R) Celeron(R) M processor 1.50GHz(null)40.8816714
PowerPC 740/750 (280.00MHz)(null)161.312647

Battery and Graphics:

Battery performance with external graphics card enabled is very very poor, approximately one and half hour. Battery life with internal graphics enabled is good and is approximately two and half hour or less. But to switch external graphics to internal power saving graphics you have to restart the laptop after changing the settings in AMD Catalyst and that is a big problem.

If you are buying it thinking that it has external graphic card than you should rethink. The external graphic card eats too much battery and you may have to switch to internal graphics for normal use.


Heating Problem:

Now its summer in India and if I put this laptop on bed and use it then it becomes so heated and I observe thermal shut-down once while the Intel laptop works fine. Even the cooling pad does not help.


At the end after using HP Pavilion g6-2313AX for few months with Ubuntu the conclusion is that this is not a good deal, even my other two year old Dell Inspiron i5 laptop gives better and smooth performance than g6-2313AX. This laptop is crap. I would be lucky if I get a chance to exchange it with Intel one.I would suggest you not to buy this laptop.

Monday, February 18, 2013

HP Pavilion G6-2313AX dual booting Ubuntu 12.10 and Windows 8

Here is my experience with HP Pavilion g6-2313AX with Windows 8 and Ubuntu 12.10 dual boot.

Before starting Installtion:
Get Windows 8 DVD with key and Ubuntu DVD for installation.

Installing Windows 8:
Installing Windows 8 is easy. While installing Windows 8, leave lot of free space for installing Ubuntu later. Windows will create 4 partition i.e sda1 , sda2, sda3, sda4. I gave only 100 GB for Windows 8 to live in my notebook.

Ubuntu recommends that EFI boot partition should be 200 MB and Windows 8 create EFI partition only of 100 MB. So first I installed Windows 8 and then Ubuntu. Windows 8 create only 100 MB EFI partition so I stopped the installation of Windows 8 in the middle and used Live Ubuntu from pen drive to boot and open GParted. Deleted every partition except sda1 and sda2.  Now change the size of EFI partition to 400 MB.

If for some reason GParted fails than use Ubuntu installer to resize the EFI partition. When using Ubuntu installer do not delete sda1(Windows recovery) and create EFI partition of 200 MB and continue with installation and cancel Ubuntu installation after disk formatting stage has done. Now go to Windows 8 partition. Delete every partition except sda1 and sad2. Format(not delete) the sda1 and sda2 with Windows 8 to clear any old entries for fresh install and creat 100 GB partition using Windows 8 partitioning system. Windows 8 will automatically create sda3 and sda4. Windows create sda3 - 128 MiB partition automatically while installation. Windows 8 will install successfully. Now with UEFI only Windows 8 boot by default.

HP Pavilion g6-2313AX has secure boot and I have disabled the legacy support from BIOS to avaoid any future problem while dual booting Windows 8 and Ubuntu 12.10. For it I used the GParted for partitioning the 1 TB hard disk drive.

Windows 8 and Ubuntu dual boot with UEFI  disk partition scheme. 
  • /dev/sda1 is windows recovery partition.
  • /dev/sda2 is EFI boot partition.
  • /dev/sda3 is Windows 8 system drive automatically created by Windows while installation.
  • /dev/sda4 is the NTFS partition where Windows 8 is installed.
  • /dev/sda5 is ext4 and Ubuntu is installed in this drive.
  • /dev/sda6 is swap partition for Ubuntu.
  • /dev/sda7 is the ext4 partition and its mount point is /home.
-->

Installing Ubuntu:
Boot from Ubuntu DVD or Ubuntu pen drive. Click Next ,next.... and then there is partition manager asking to to use whole disk. Choose "Something else". Now you will see windows drive and some free space. Do not touch any of the windows drives from sda1 to sda4. Make new partition for Ubuntu and choose right mount point. Don't forget to leave some space for Linux Swap. Ubuntu will go inside drive which has mount point "/" i.e sda5 here. Now continue with installation.
New partition created during Ubuntu installation:

  • /dev/sda5 is ext4 and Ubuntu is installed in this drive.
  • /dev/sda6 is swap partition for Ubuntu.
  • /dev/sda7 is the ext4 partition and its mount point is /home.
When the installation of Ubuntu finishes it will ask for restart. But after restart, the OS that boot is Windows 8.  So to boot Ubuntu go to boot option by pressing escape key just after power button is pressed and press F9 key to see boot option. Ubuntu should be there as second option.

Missing old GRUB Menu On Start-up:
Install GRUB to see a list of Operating System to choose from for boot. For this install Boot Repair in Ubuntu with this command:

sudo add-apt-repository ppa:yannubuntu/boot-repair && sudo apt-get update && sudo apt-get install -y boot-repair && boot-repair

After this click Recommended Repair option or advance if you want. Follow the instructions. On reboot you will see old GRUB menu. Windows may fail to boot so disable secure boot from BIOS.

Wednesday, February 13, 2013

HP Pavilion G6-2313AX Review with Windows 8

I recently purchased HP Pavilion G6-2313AX Laptop. Its ships with free DOS and its hardware specification are:

Product Nameg6-2313ax
Product NumberD5F90PA
Microprocessor2.3 GHz AMD Quad-Core A10-4600M
Microprocessor Cache4 MB L2 cache
Memory6 GB 1600 MHz DDR3
Video GraphicsAMD Radeon HD 7660G/7670M Dual GPU (2 GB DDR3 dedicated)
Display15.6" diagonal HD BrightView LED-backlit (1366 x 768)
Hard Drive1 TB 5400 rpm SATA
Multimedia DriveSuperMulti DVD burner
Network CardIntegrated 10/100 BASE-T Ethernet LAN (RJ-45 connector)
Wireless ConnectivityBluetooth
802.11b/g/n
Sound2 x Altec Lansing Internal speakers; Dolby Advanced Audio v2 Audio playback; Dual speakers
KeyboardFull-size island-style keyboard
Pointing DeviceTouchPad supporting multi-touch gestures and on/off button
PC Card SlotsMulti-format digital media card reader for secure digital cards & multimedia cards
External Ports
    2 SuperSpeed USB 3.0
    1 HDMI
    1 VGA
    1 RJ-45
    1 Headphone-out (Stereo)
    1 Microphone-in
Dimensions37.6 x 24.4 x 3.63 cm
WeightStarting at 2.48 kg
Power90W AC Power Adapter
6-cell Li-Ion
What's In The BoxHP TrueVision HD Webcam with integrated digital microphone (High Definition low-light)

I use Windows Operating System rarely. Here is my experience with it while using Windows 8 on HP Pavilion G6-2313AX.
  1. As HP Pavilion G6-2313AX comes with free DOS, I installed Windows 8 on it.
  2. With default installation only few device driver are installed and after installing Windows update few more device drivers are installed and updated.
  3. Many people are complaining for device driver for HP Pavilion G6-2313AX. Easily Downloaded all the Windows 8 64 bit device drivers for HP G6-2313AX from HP web-site with this link.
  4. Skip the Qualcomm Atheros drivers as HP G6-2313AX has the Ralink Bluetooth and WiFi adapter.
  5. After installing all the device drivers everything is working fine.
  6. Now HP Pavilion G6-2313AX is a running smooth. Looks like it does not has any kind of heating problem while using Windows 8 if proper drivers are installed. No need of cooling pad that came with it. I am using its cooling pad to cool down Raspberry Pi board.

Here is the Windows 8 experience index for HP Pavilion G6-2313AX with default windows 8 installation:

-->


HP G6-2313AX is better supported by Windows 8 if compared to Ubuntu Linux. Performance is good with Windows 8. But even after installing official drivers from HP does not improve this score in each category. After using this laptop for more than a week, the performance is good for normal use but not for heavy application use.

Plus Points:

  • It has 1 TB HDD.
  • It has 6 GB DDR3 RAM
  • It has 2.5 GB (512 MB Integrated+2 GB Dedicated) graphics.
  • It has a good keyboard.
  • Touch-pad is better than other laptops.
  • Web-Cam quality is good.
  • Video & audio chat experience is very good while using it with Google Hangout.
  • Audio quality is good.
  • No heating problems if used with proper driver installation.
  • No need to buy separate cooling pad.
  • Build quality is very good.

Negative Points:

  • Resolution is low (1366 x 768).
  • AMD Quad-Core A10-4600M processor do not provide that good performance if compared to similar Intel processors. My other 2 year old dell laptop with i5 processor gives better performance than this.


Overall its not that good buy for approx INR 38000 or USD $710. A major drawback with this laptop is that it has AMD processor. Its the first time I bought AMD laptop and not happy.


HP Pavilion G6-2313AX Drivers Download

I recently bought HP Pavilion G6-2313AX from flipkert. After reading reviews I found out that many people are having trouble to download drivers for HP Pavilion G6-2313AX. All Windows 8 drivers are available from HP web site and is available to download from this link.

I installed to Windows 8 and Ubuntu 12.10 on HP Pavilion G6-2313AX. Windows 8 works good with default installation and few device drivers are available from windows update like wifi, touchpad, graphics etc and other device drivers have to be downloaded from HP website.

While Ubuntu 12.10 on HP Pavilion G6-2313AX have problems with wifi, grphic card, touchpad, screen brightness, much more load on processor as compared to Windows 8.


HP Pavilion G6-2313AX with Windows 8.
HP Pavilion G6-2313AX with Ubuntu 12.10
HP Pavilion G6-2313AX dual boot Windows 8 and Ubuntu.

Tuesday, January 15, 2013

How to force browsers to use IPv6 Instead of IPv4

I am using freenet6/gogo6 IPv6 tunnel broker service for IPv6 connectivity. First you need to set up IPv6 tunnel. But many times when I visit IPv6 enabled web-sites then browser connect to IPv6 enabled using using IPv4 like gmail.com.

So the trick to force browser to use IPv6 is to disable IPv4 DNS server or completely disable IPv4 address scheme from network configuration and replace the IPv6 tunnel address with the naked IPv4 address in tunnel configuration file so the computer is able to connect to IPv6 tunnel without IPv4 DNS.

Here is how to do it on Ubuntu 12.10, Simply go to Network Connection and edit your internet connection. 


-->


Check IPv6 DNS servers are properly set up.
Choose "IPv4 Settings" and change Method to "Atomatic (DHCP) address only" and then do not provide ant IPv4 DNS server . Save and reconnect to network.
IPv4 sites still work but those web sites which are IPv6 enabled are accessed through only IPv6. Some application may crash (like network tools) or may not work at all because there is no IPv4 DNS address. IPv4 can be disabled completely if not required. After completely disabling IPv4, only IPv6 enabled web sites will open.

For gogo6 / freenet / gogoc users: 

Use the IPv4 address instead of any domain name in gogoc configuration file.
sudo nano /etc/gogoc/gogoc.conf
For server=montreal.freenet6.net IPv4 address value is 64.86.88.116. It should look like this:
server=64.86.88.116
Save and close file. This command will be helpful if you face any key related problem in gogoc :

sudo /usr/sbin/gogoc -n
Press ctrl+c to end the above command if it do not end itself.


Now restart gogoc service with the following commands using appropriate command:
to start:      sudo service gogoc start
to stop :      sudo service gogoc start
to restart:    sudo service gogoc restart


You may observe some frequent disconnect of network connection or no internet connectivity on PC start-up or when network reconnect occurs. This is because IPv6 tunnel takes some time to connect.

Sunday, January 13, 2013

Configure IPv6 tunnel on Ubuntu

Having trouble configuring IPv6 tunnel on Ubuntu. Follow these 10 simple steps below to configure IPv6 tunnel on Ubuntu easily.

Step 1: First signup with a free account on gogo6.


Step 2: Get free freenet6 tunnel from here (gogo6 account required from step 1). You will receive a username and password in your email box from this step. These will be your tunnel username and password. These will be used in step 4.


Step 3: Install gogoc and Router Advertisement Daemon from Ubuntu Software Center.


Step 4: Now edit /etc/gogoc/gogoc.conf in your favorite text editor. Super User or root privileges are required.
  • Open terminal: ctrl+alt+t .
  • Run this command:  sudo gedit /etc/gogoc/gogoc.conf
  • Run ifconfig command in new terminal window [ctrl+alt+t] and get interface name. Usually it is eth0 for wired and wlan0 for wireless connection.
  • Edit the following fields:
userid= #tunnel user id from step 2
passwd= #tunnel password from step 2
server=montreal.freenet6.net or amsterdam.freenet6.net
auth_method=any
host_type=router
if_prefix=eth0   
#run command "ifconfig" to check its correct value, usually its eth0 or eth1 for ethernet and wlan0 or wlan1 for wireless lan.
dns_server=2001:4860:4860::8888
tunnel_mode=v6anyv4
log_console=0
log_stderr=1
log_file=1
log_syslog=0
log_filename=/var/log/gogoc/gogoc.log
Leave the rest fields to their default. Save the file [ctrl+s] and close.
    For Sever use montreal if tunnel endpoint you choose in step 2 is montreal then it becomes montreal.freenet6.net or use the naked IPv4 address (64.86.88.116) of montreal server.

Step 5: Open terminal and check that gogo6 service is running or not.
  • To start gogo6: sudo service gogoc start 
  • To restart: sudo service gogoc restart 
  • To Stop: sudo service gogoc stop
  • After a proper start or restart you will see [OK] in terminal.
-->

This command will be helpful if you face any key related problem in gogoc :
sudo /usr/sbin/gogoc -n
Input Yes when it asks and press ctrl+c to end after a minute.


Step 6: Now open the gogo6 log file /var/log/gogoc/gogoc.log . If you are successfully connected then you will see:
Your IPv6 address is 2gge:0ty0:1000:000b:0000:0000:0000:gfgf
Your IPv6 prefix is 2gge:0ty0:1rr6:ty00:0000:0000:0000:0000/56
Your IPv6 DNS address is 2001:4860:4860:0000:0000:0000:0000:8888

These address will be different in your gogoc log file. Computer now have its own global IPv6 address.

If you see finished at the end of gogo6 log file then it means gogo6 tunnel is disconnected and repeat step 5. If problem persist then check userid and password are correct and are from step 2.


Step 7: Create if does not exist and edit /etc/radvd.conf , Similar to step 4. Replace its contents with
interface eth0
{
   AdvSendAdvert on;
   prefix 2gge:0ty0:1rr6:ty00:0000:0000:0000:0000/56
   {
        AdvOnLink on;
        AdvAutonomous on;
   };
};
Replace the prefix value in above lines with the prefix value that your computer get from gogo6. Its in log file at /var/log/gogoc/gogoc.log. 

Restart Radvd Service: sudo service radvd restart.


Enable IPv6 routing: Edit the sysctl.conf to enable IPv6 routing with the following command.
sudo gedit /etc/sysctl.conf
Un-comment the following line / Remove hash from the start of the following line:
net.ipv6.conf.default.forwarding=1

Step  8:
Reset network connection (disconnect and connect) or restart computer. Wait few seconds and IPv6 tunnel will connect itself. View Connection Information to check IPv6 address.


Step 9 (optional): Sometimes tunnel will take too much time to reconnect. To avoid this you can change the following fields in gogoc configration file at /etc/gogoc/gogoc.conf
auto_retry_connect=yes
retry_delay=5
retry_delay_max=30
You can repeat step 5 to check gogoc is running or not.


Step 10: You are required to add IPv6 DNS server address manually. To add IPv6 DNS server:


Edit Network Connections

Change method to "Automatic, address only" and add the Google IPv6 DNS server address.
After saving settings and resetting network, Connection Information will show this.

+ Point: With this setup you can make free calls to USA and Canada. Check out Google Voice in your Gmail.


Now Google my ip to get to now your IPv6 or Test IPv6. The tunnel will break if the network connection is reset. Gogoc tunnel will reconnect if not then restart it manually. If you want to force IPv6 over IPv4 than visit this blog article.


Make free calls to USA/Canada


Want to make free calls to USA and Canada with free IPv6 tunnel having endpoint in USA or Canada. 

All you need is a good internet connection and computer with mic and audio output. 

-->