Tuesday, March 12, 2013

Google Play recommends to switch to the new Developer Console!

Google Play developer console has now finally recommends to switch to new Developer console with version 2. Below is the message alert displaying in Google Play Developer Console.


Now is the time to make the switch to the new Developer Console! The new version features a streamlined publishing flow, store listings in more languages with language-specific graphics, and new user ratings statistics in addition to all of the functionality of the old version. We'll be retiring the former version on April 15 to focus our efforts on this new experience so that you’ll have better tools for delivering great Android apps that delight your users.


New Developer Console is far better than the old and a good layout and interface.

New Google Play Developer Console Version 2

Sunday, March 10, 2013

Getting Started with Ubuntu

New to Ubuntu and have installed a fresh Ubuntu version. Facing problem in finding and installing software. Here is small and simple steps to solve this issue.

1. Get Ubuntu One account: 

Ubuntu One is a cloud which helps store, sync and share information in a Canonical cloud and it comes with 5 GB storage. Sign up for Ubuntu One account and log-in with the Ubuntu One app provided by Ubuntu and select folders to sync. The same log-in will be used in Ubuntu Software Center.

2. Learn to Use Terminal:

Terminal is very important software in Ubuntu or Linux. It can be opened vary easily with the keyboard key combination:  ctrl+alt+t or find "terminal" in dashboard search. Terminal is used to run commands. Try your first command in terminal. Write the following text line in terminal.
sudo apt-get update


It is recommended to run above command if you did offline installation. The above command will ask for administrator password and then will check for updates. Usually it is log-in password. It will also update the software catalog. So there will not be any problem while installing software packages later. It will take few minutes to complete.


2. Install Software Packages in Ubuntu:

Ubuntu comes with lot of useful software packages pre-installed like browser, office suite, document viewer, transmission etc. But a lot of packages has to be installed to fulfill different requirements.

So Ubuntu comes with a Software Center and have a great catalog of Software Packages and is properly categorized. Here is a list of few important software packages. Open the Software Updater app from dashboard and install the following software packages along with their add-ons listed in Ubuntu Software Center:
  1. VLC - Read, capture, broadcast your multimedia streams
  2. Ubuntu Restricted Extras - Commonly used applications with restricted copyright (mp3, avi, mpeg, TrueType, Java, Flash, Codecs)
  3. 7zip - 7zip compression/un-compression tool includes rar support
  4. Chromium Web Browser - Browser to Access the Internet
  5. ia32-libs       - Required to run 32 bit software on 64 bit platform.
  6. OpenJDK Java 7 Runtime - OpenJDK Java runtime, using Hotspot JIT
  7. Klavaro - Yet another touch typing tutor
  8. Arista Transcoder - Convert multimedia for all your devices
  9. GParted Partition Editor - Create, reorganize, and delete partitions
  10. Multiget - Download Manager
  11. Stellarium - Planetarium
  12. GIMP Image Editor - Create images and edit photographs
  13. Blender - 3D modeling, animation, rendering and post-production
Install all of above packages with all in one command from terminal:

sudo apt-get install vlc vlc-plugin-notify vlc-plugin-pulse ubuntu-restricted-extras ubuntu-restricted-addons flashplugin-installer flashplugin-nonfree-extrasound  ttf-mscorefonts-installer p7zip-full p7zip-rar chromium-browser djview-plugin ia32-libs openjdk-7-jre icedtea-7-plugin klavaro arista gnome-codec-install python-webkit multiget stellarium gimp gimp-data-extras gimp-flegita gimp-gmic gimp-gutenprint gimp-plugin-registry gvfs-backends xcftools blender yafaray gparted  

-->
All these software packages are available from Ubuntu Software Center, But there will be lot more software packages which are needed to be download from the internet in the form of .deb packages.
If you intend to develop then you have to install many development related packages according to your needs. There are lot of them available in Ubuntu Software Center. For java, c, c++ you may need following.
  • Oracle JDK 7
  • build-essentials (Available from Ubuntu Software Center)
  • Eclipse - Eclipse Integrated Development Environment (Available from Ubuntu Software Center)

Saturday, March 2, 2013

Raspberry PI as IPv6 router in Home Network

Its been many years IPv6 is introduced but still most ISP are using IPv4. Here I am sharing, how to use the Raspberry Pie as IPv6 router in tunneled mode. No need of IPv6 capable router. IPv6 will also work over Wi-Fi of old IPv4 router. I am using the IPv6 tunnel broker gogo6/Freenet for IPv6 connectivity.

Requirements:
  1. Raspberry Pi with Raspbian Wheezy
  2. Connect Raspberry Pi to router with Ethernet cable
  3. Optionally connect to raspberry pi using shh with this command from the terminal:
  4. ssh pi@ip_address

Step 1: Login in your Raspberry pi via ssh and install gogoc client and radvd with the following command.
sudo apt-get update 
sudo apt-get install gogoc radvd
gogoc is client for IPv6 tunnel broker freenet and radvd is used to provide router functionality.

Step 2: Now sign up for gogoNET account and login.

Step 3: After login, get your freenet6 tunnel username and password from here. Freenet6 tunnel username and password is different from login. Choose any one of the tunnel end point server and make new username and password for the freenet6 IPv6 tunnel.

Step 4: Now edit the gogo6 configuration file with the following file.
sudo nano /etc/gogoc/gogoc.conf
Edit the following fields:
userid= #tunnel user id from step 3
passwd= #tunnel password from step 3
server=montreal.freenet6.net or amsterdam.freenet6.net
auth_method=any
host_type=router
if_prefix=eth0   
#run command "ifconfig" to check its correct value, usually its eth0 or eth1 for ethernet and wlan0 or wlan1 for wireless lan.
dns_server=2001:4860:4860::8888
tunnel_mode=v6anyv4
log_console=0
log_stderr=1
log_file=1
log_syslog=0
log_filename=/var/log/gogoc/gogoc.log
Leave the rest fields to their default.

Step 5: Now restart gogoc service with the following commands using appropriate command:
to start:      sudo service gogoc start
to stop :      sudo service gogoc start
to restart:    sudo service gogoc restart


This command will be helpful if you face any key related problem in gogoc :
sudo /usr/sbin/gogoc -n

Step 6: Run the following command.
ifconfig
You should see "tun" interfaces and IPv6 address allocated to your PI if you properly configured the gogoc configuration file in step 4.

Step 7: Now open the log file of gogoc to see prefix allocated to you with the following command:
cat /var/log/gogoc/gogoc.log
You should see a line:
gogoc: Your IPv6 prefix is 2221:0222:1996:0000:0000:0000:0000:0000/56 
if you are successfully connected. Copy it. If there is no IPv6 address than it will show some error messages and will retry after some time.

Step 8: Enable IPv6 routing. Edit the sysctl.conf to enable IPv6 routing with the following command.
sudo nano /etc/sysctl.conf
Uncomment the following line / Remove hash from the start of the following line:
net.ipv6.conf.default.forwarding=1

Step 9: Now we will configure radvd. Run the following command
sudo nano /etc/radvd.conf
Paste the following lines in this file:

interface eth0
{
   AdvSendAdvert on;
   prefix 2001:xxxx:xxxx::/64
   {
        AdvOnLink on;
        AdvAutonomous on;
   };
};


Replace the eth0 with network interface prefix you want to configure. It has same value of if_prefix in step 4 or check it with "ifconfig" command. Usually it is eth0 or wlan0.


Replace the prefix in the above line with the prefix allocated to you from step 7 like this:
prefix 2221:0222:1996:0000:0000:0000:0000:0000/56

-->

Step 10: Now restart radvd with the following command.
sudo service radvd restart
Step 11: Explicitly provide IPv6 DNS in PC network configuration. Prefer Google IPv6 DNS servers.


To force IPv6, do not provide IPv4 DNS:
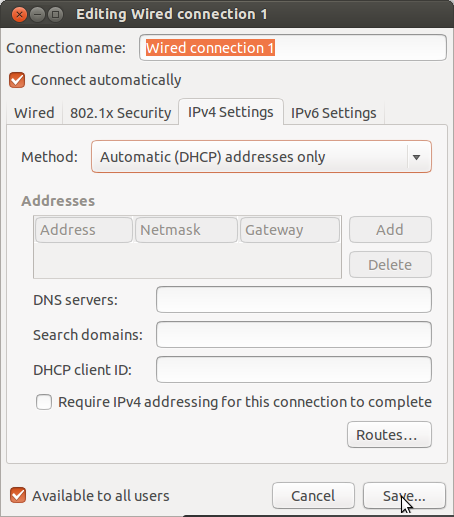
In IPv4 Settings select Automatic(DHCP) Address only and do not provide DNS server. IPv4 only websites will resolve   fine as IPv6 DNS is already provided in IPv6 Settings.

Now Raspberry PI will work as a IPv6 router in tunneled mode and it will work on Wi-Fi of your home router also. Android device may not work in only IPv6 only network. Check out your IPv6 Connectivity from here or Google for many other test sites. Now all devices will automatically get IPv6 addresses. One of the best thing with IPv6 is that no port forwarding is needed. Check that PC is getting IPv6 address automatically. Many web site will prefer IPv6 automatically like Google and Yahoo.